|
Calculating work item age is an essential part of running and optimising a workflow using Kanban practices. Contrary to popular belief you can benefit from Kanban measures and workflow optimisation regardless of what other processes you may have implemented (e.g. Scrum or DSDM or even a scaling framework). For the purpose of this article I would assume that you understand the ideas of Kanban for knowledge work and that you will know why tracking work item age is essential.. Work item age is important to help manage your workflowImportant update: In the time since creating this article I have gone through the trouble of creating and publishing a Jira Cloud app that does all this for you without the need ti implement the steps below. It is easy to configure and use, it is well tested and best of all, it is free. Check the free Work Item Essentials app here. Of course, if you’re anything like me, you would already know the importance of Kanban metrics and one of the first thing you would want from your tracking tool (e.g. Jira) is to have work item age calculated for the work items on your Kanban board. You could always keep track of something like that in a spreadsheet but automating it in Jira will certainly save you time. With that in mind let’s jump right in. In order for this to work you will need to have Project Admin access or have someone with that access to perform the steps for you. You will also require a couple of custom fields. When you implement the same steps that I have done here’s what you can get on your Kanban board in Jira. I’ve had to remove client sensitive data but hopefully it is clear what we’re seeing on this picture. Every card on the board that has moved from ToDo into one of the in progress columns has a calculated Work Item age in days - this is the number highlighted in yellow in this picture. 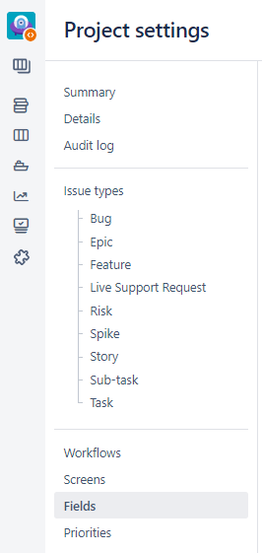 Here’s how to do it. Step 1 - Custom fields You are going to need a couple of custom fields. Of course depending on your Jira configuration you may discover that you already have such fields that you can re-use. The required fields are:
Although most organisations don’t give away Jira Admin access easily I know that in some cases you could get one. But if not, there’s usually a way to request additional fields and so your first step is to get these set up. Without them we can’t move forward.
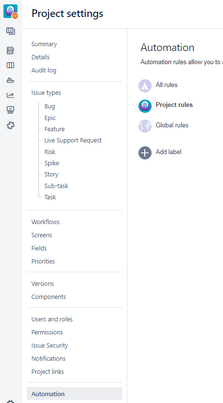
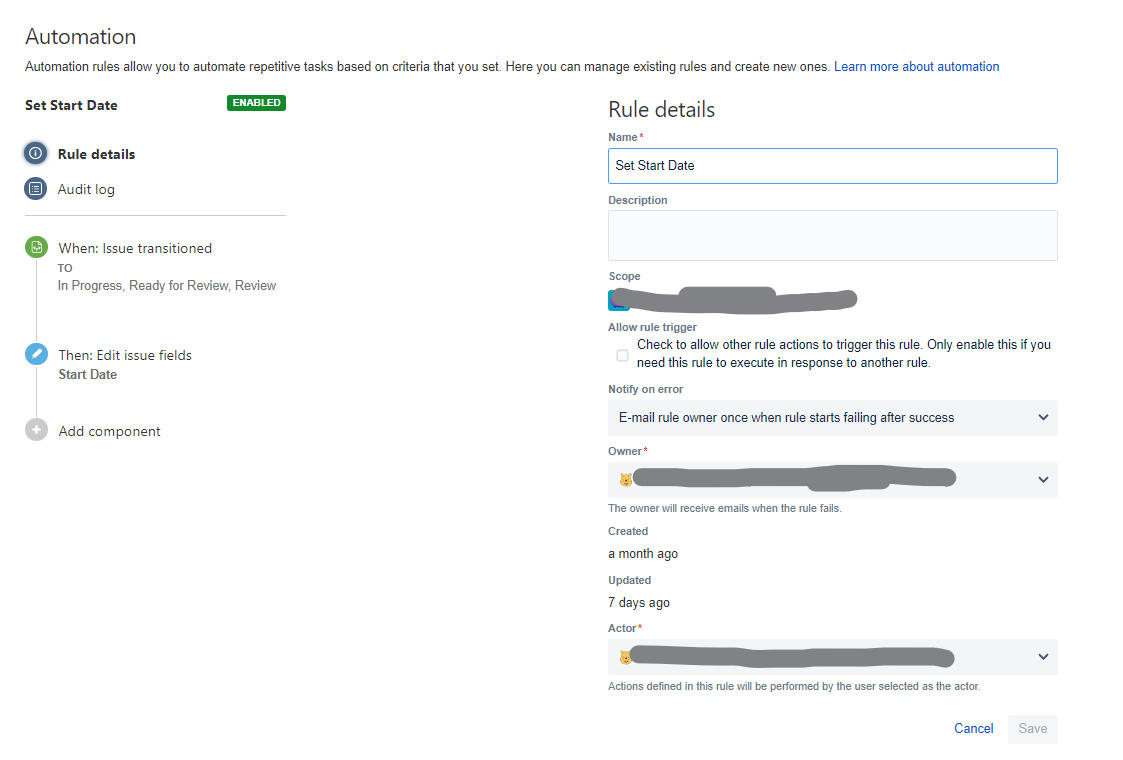
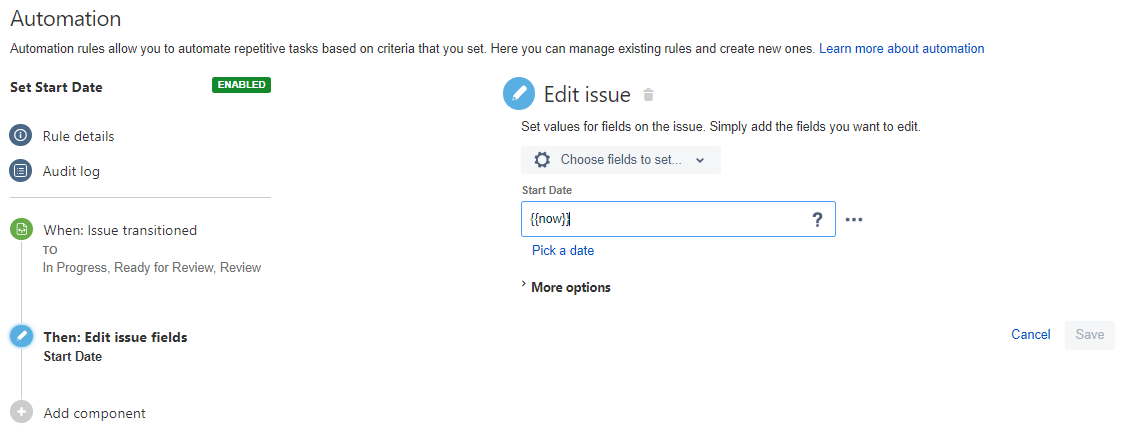
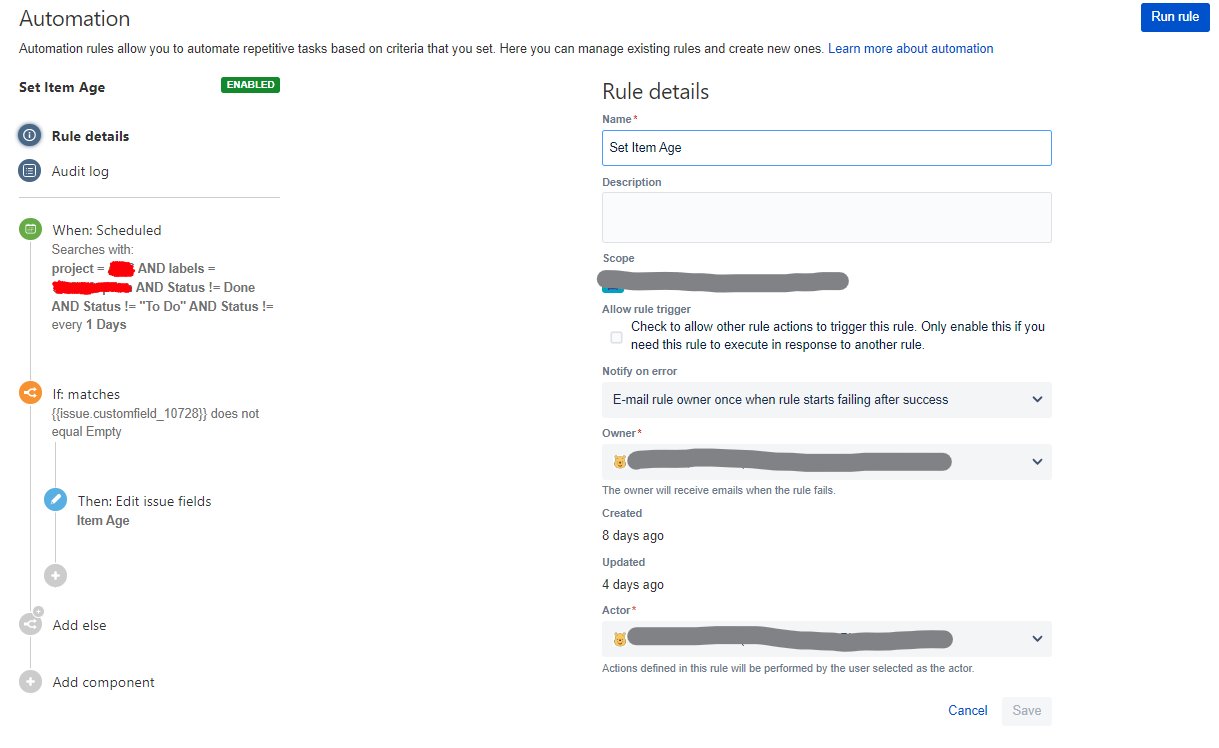
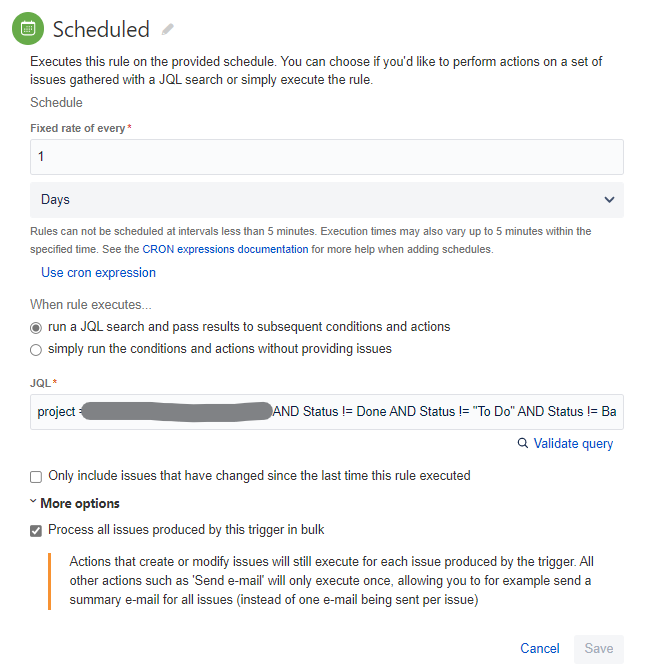
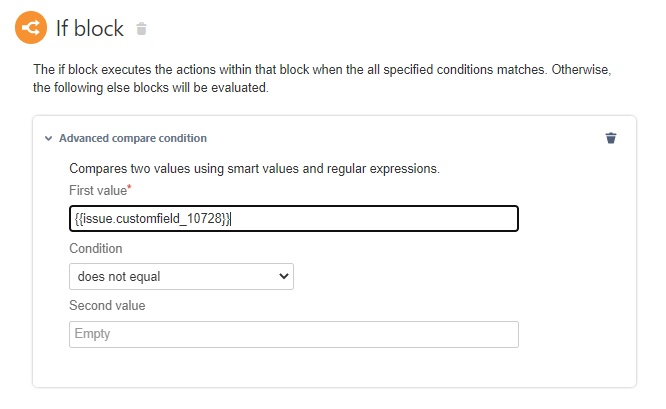
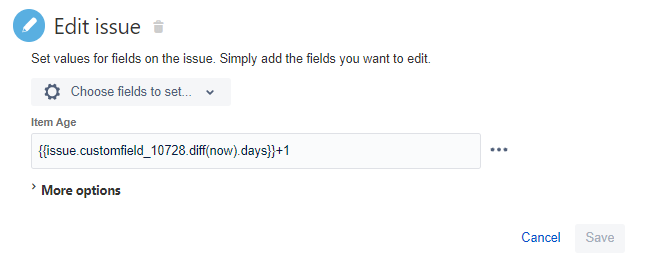
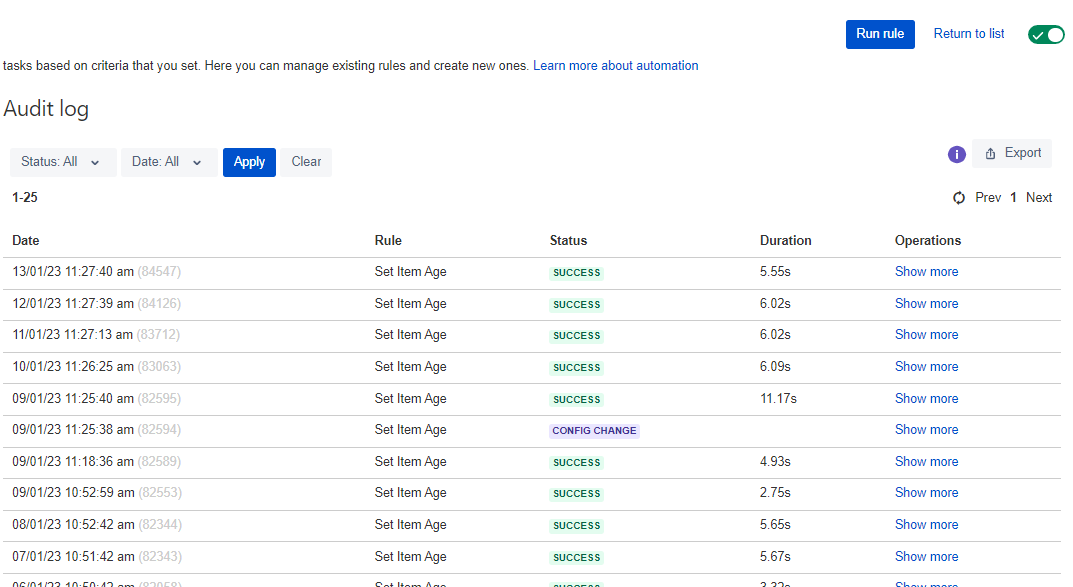
Step 3 - Create an automation to set the Start Date The first automation we need is to set Start Date. Why do we need that? Could we not just pick up the transition date of the first In Progress status? You could, depending on what you need but you will likely need a Jira plug-in to be able to access that date. In addition it is possible that some of your work items go from Not-Worked-On to Worked-On by transitioning to more than one status -e.g. In Discovery, In Progress, In Analysis, etc. there are many options depending on your workflow. If you had multiple in progress start states then picking up the transition from just one of them would not work. Therefore it is safer to set a Start Date based on state changes similar to below. First we need to create a new automation. Let’s call it “Set Start Date” and define when to trigger the automation. In my case I have triggered it for all the in progress states in my workflow - that is when an item moves from To Do to any of “In Progress”, “Ready for review” or “Review” states. There are a few more fields to set up and I had to black out some of them for confidentiality reasons but there straightforward to set. Make sure to switch off emails to avoid annoying others. On the next step we have to set what value we are assigning to our Start Date field when the above condition happens. Here, I have used simply the {{now}} value which should give you the date and time of the moment the state of this item changes. You could use a different formula in this field if necessary, depending on what you require but if you just want to set the start date, like I did, then the {{now}} value will be sufficient. Now you have your start date being set up every time a work item changes into one of your active statuses. If you already have existing work items you could manually set the Start Date value for them by editing them one by one or in bulk. The more start dates you have set, the more items will get their item age calculated when we set up the next automation Step 4 - Set work item age automation We begin in a similar way by creating a new automation and while in comparison with the start date this is a more complicated field to set, it is still relatively simple to achieve. As you can see from the screen we have given it a name - e.g. Set Item Age and we have defined when to trigger it. In this case we choose to trigger the rule daily and only for all the items that are work in progress - that is not in To Do and not in Done. You may want to switch off Emailing for this rule as this will trigger daily for all WIP items and therefore could send many emails and be considered annoying by your team mates. Here is how the scheduling screen looks for this automation - I want it triggered daily and for all the WIP work items. You will notice from the previous screen above that I have an “If” condition here. This is because I only want to calculate Work Item Age if the Start Date is set. If the start date is not set I want to ignore the work item. If applicable you can do something else when Start Date isn’t set in your scenario but for me, I prefer to leave it blank. Here’s how the If block is configured. The text in {{ }} brackets is issue.<my custom field identifier>. Yours will be different and you will need to find out what it is. I got mine from writing a JQL query and picking it up from the predictive text tool which pops up as you write the name of your custom field. Here's a handy text version of this so you can copy/paste it, but remember to change the number to your specific custom field number - issue.customfield_14273 This is the id of my Start Date custom field. I want to check if it’s Empty and only run the calculation work work item age if Start Date is not empty. Now that I’ve set my condition for only updating work items that have a start date, I can add the calculation of the work item age field. In the Edit Issue section I need to select the appropriate custom field - e.g. the Work Item Age field and then add the formula that calculates the difference between Start Date and Today and add one. We add at the end 1 so that items that start today and finish today have a value of 1 instead of 0. And again here's a text version of this piece of script so you can copy/paste it - {{issue.customfield_14273.diff(now).days}}+1 When you’ve done this you are ready to try out your rule. As long as you have at least one work item with Start Date set you can test to see if your work item age update works. You will see a blue “Run rule” button at the top right of the screen that allows you to trigger your rule. You can also see the results of the run in the audit log section. If your automation has an error you are likely to see a very short execution time. Finally you should check the value of your Work Item Age custom field for the work items that have Start Date set to make sure that the calculation is correct. Step 6 - Show Work Item Age on your kanban board
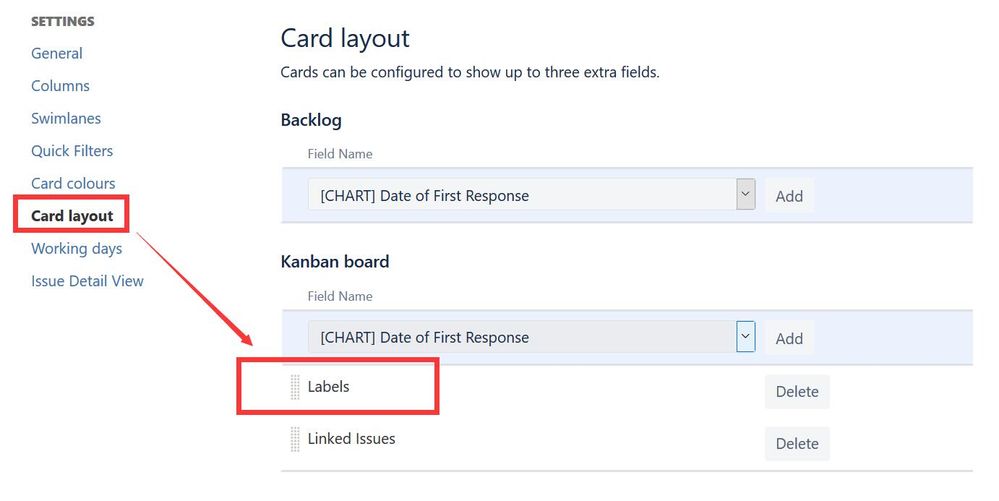
I would say that this is optional and depends on whether you want to see the work item age for yourself or you want to make it visible to everyone on your kanban board. I can’t think of many reasons not to show it but since I don’t know your context I accept that there could be valid reasons. To show the work item age you need to go to Configure board on your kanban board screen and in the card layout section make sure to add your Work Item Age custom field to display on all visible cards. From there on you can benefit from always seeing the age of your work items in plain sight on your Kanban board. Enjoy! |
Welcome to our blog!About the authorPlamen is a LeanStack coach and an experienced Software Delivery consultant helping organisations around the world identify their path to success and follow it. Archives
May 2024
Categories
All
|



 RSS Feed
